I’ll be honest with you — when I first started keto, figuring out which deli meats worked for my new eating plan felt overwhelming. Genoa salami was one of those foods I just wasn’t sure about. After diving deep into nutrition labels and testing it in countless recipes (including my favorite keto salami roll-ups), I’ve learned exactly what makes this Italian favorite such a great choice for low-carb eating.
Living in New Orleans, we take our charcuterie seriously. And trust me, Genoa salami has become a staple in my fridge for quick keto snacks and easy weeknight dinners when the kids have late practices. I’ve even gotten brave enough to make my own — it takes about a month of patience, but wow, is it worth it!
Table of contents
- What Exactly Is Genoa Salami?
- Breaking Down the Carbs in Genoa Salami
- My Homemade Genoa Salami Adventure (Yes, You Can Make It!)
- Is Genoa Salami Really Keto-Friendly?
- How Genoa Salami Compares to Other Deli Meats
- Smart Ways to Enjoy Genoa Salami on Keto
- Watch Out for Hidden Carbs
- You Might Also Like
- Storing Your Genoa Salami
- Frequently Asked Questions
- The Bottom Line
What Exactly Is Genoa Salami?
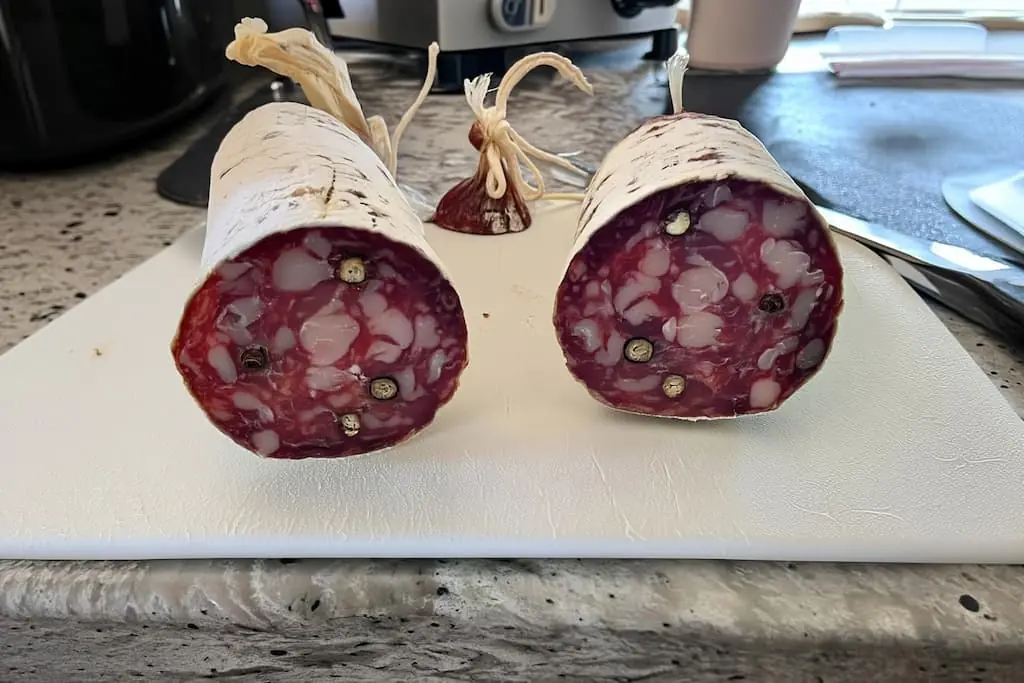
Genoa salami is a type of Italian cured meat that gets its name from Genoa, Italy. What makes it special is the mix of pork and beef (sometimes just pork), plus whole peppercorns that give it that signature look and gentle kick.
The meat is fermented and air-dried, which creates that tangy flavor we love. It’s softer than hard salami and has a richer taste that my kids actually prefer. I’ve found it’s less salty than other salamis too, which means I can enjoy more without feeling parched.
Breaking Down the Carbs in Genoa Salami
Here’s the good news that’ll make your keto heart happy — Genoa salami typically contains less than 1 gram of carbs per serving. According to the USDA, one slice (about 9 grams) has just 0.1 grams of carbohydrates.
Let me break down what you’re getting in a typical 1-ounce serving (about 3 slices):
- Calories: 105
- Total Carbs: 0.3g
- Protein: 5.7g
- Fat: 9g
- Sodium: 492mg
Those numbers make my meal planning so much easier! The high fat and moderate protein content means it keeps me satisfied between meals. Just watch the sodium if you’re keeping an eye on that — I always pair it with some cucumber slices or celery to balance things out.
My Homemade Genoa Salami Adventure (Yes, You Can Make It!)
After buying Genoa salami for years, I decided to try making it myself. I was nervous at first — curing meat sounds intimidating, right? But after 31 days of waiting (and checking on it like a worried mom), I pulled off the most amazing homemade salami. The texture was perfect, that signature tanginess was there, and those whole peppercorns added just the right kick.
I even brought one to work with the white mold still on (it’s totally safe and traditional!) and everyone was fascinated. My 12-year-old now thinks I’m some kind of kitchen wizard.
Want to Try Making Your Own? Here’s My Recipe
Making Genoa salami at home isn’t as hard as you’d think — it just takes patience and the right setup. You’ll need a place to hang it where the temperature and humidity stay consistent. I use a modified wine fridge, but some folks use their basement or a cool closet.

Homemade Traditional Genoa Salami
This authentic Genoa salami recipe creates perfectly tangy, peppercorn-studded salami at home. After 31 days of patient curing, you'll have incredible homemade salami that rivals any Italian deli.
Ingredients
- 900g pork back fat (coarse grind, 8mm plate)
- 900g lean beef (fine grind, 4.5mm plate)
- 700g lean pork (coarse grind, 8mm plate)
- 62.5g kosher salt (2.5% of meat weight)
- 6.25g Cure #2 pink salt (0.25% - essential for safety)
- 8g whole black peppercorns (0.32%)
- 3.5g garlic powder or 10g fresh minced garlic
- 7.5g dextrose (0.3% - feeds beneficial bacteria)
- 75ml red wine, chilled (about 3% by weight)
- T-SPX starter culture (follow package for amount)
- 30ml distilled water (for starter culture)
- Natural hog casings (50-60mm diameter)
Instructions
- Freeze meat and fat for 30 minutes until almost frozen. This prevents smearing during grinding.
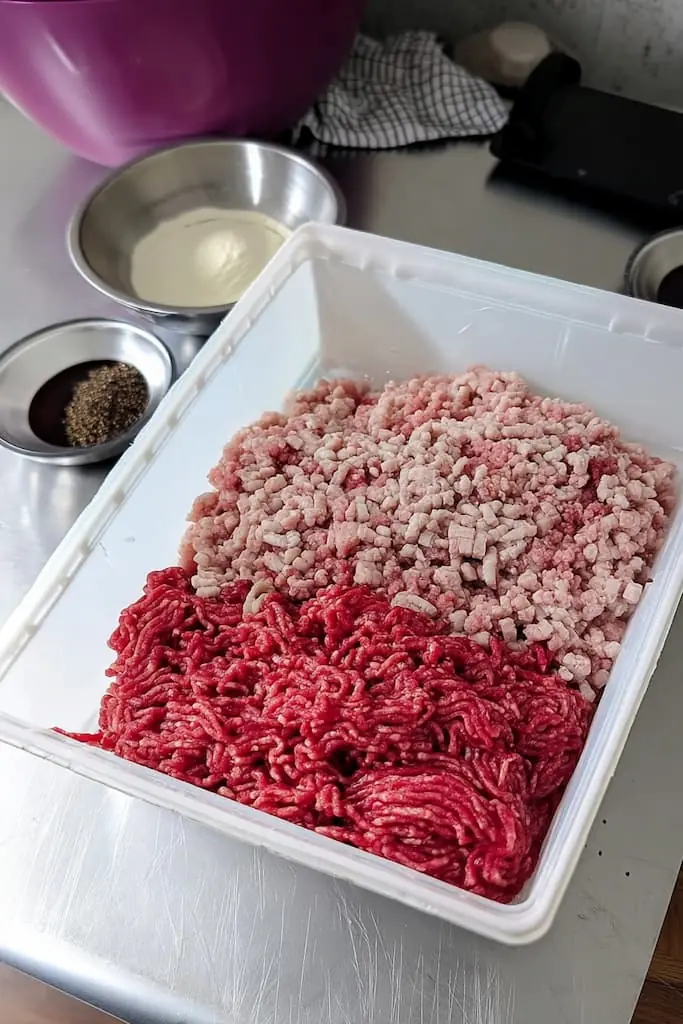 Grind the beef and lean pork through a fine 4.5mm plate. Grind the pork fat through a coarse 8mm plate. Keep everything ice cold.
- In a large chilled bowl, combine ground meats, fat, kosher salt, Cure #2, peppercorns, garlic, and dextrose. Mix thoroughly.
- Hydrate starter culture in 30ml distilled water per package instructions. Let sit 15 minutes.
- Add hydrated starter culture and chilled red wine to meat mixture. Mix by hand or paddle mixer for 3-5 minutes until tacky and well-bound.
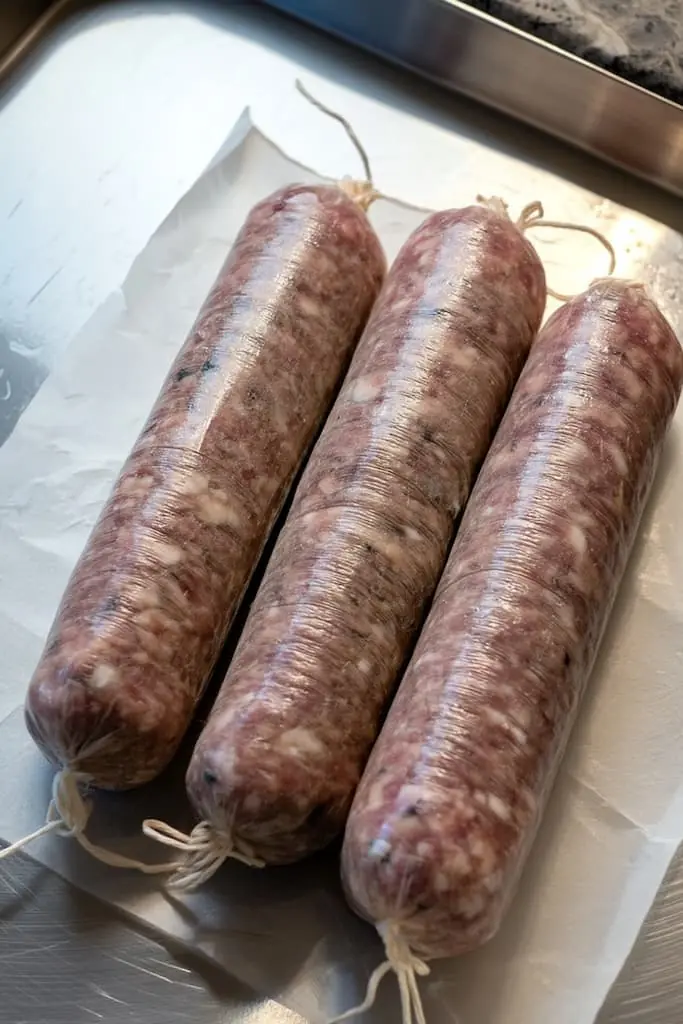
 Stuff mixture firmly into natural hog casings, forming 12-16 inch lengths. Tie off securely with butcher's twine.
- Prick any air pockets with a sterilized needle to prevent unwanted bacteria growth.
- Ferment at 68-75°F (20-24°C) with 85-90% humidity for 48-72 hours until pH reaches 5.0-5.3.
- Move to curing chamber at 54-57°F (12-14°C) with 75-80% humidity. Ensure good airflow.
- Age for 28-35 days, monitoring weight loss weekly. White mold growth is normal and beneficial.
- Salami is ready when it loses 35-42% of starting weight, typically around day 31.
- Wrap in butcher paper and refrigerate. Slice thinly across the grain to serve.
Notes
- Safety first: Never substitute Cure #2 with Cure #1 or skip it entirely. It prevents botulism during the long curing process.
- Temperature control is crucial. Consider investing in a wine fridge conversion or curing chamber for consistent results.
- The white mold that develops is Penicillium nalgiovense - it's safe and adds authentic flavor. Only remove if you prefer the appearance without it.
- Start with a small test batch to dial in your curing environment before making large quantities.
- Can't find T-SPX culture? Bactoferm F-RM-52 works well too. Order online from sausage-making suppliers.
- Weigh your salamis weekly and keep a log. This helps you learn your environment's drying rate.
Nutrition Information:
Yield:
53Serving Size:
1Amount Per Serving: Calories: 106Total Fat: 6gSaturated Fat: 2gTrans Fat: 0gUnsaturated Fat: 3gCholesterol: 42mgSodium: 535mgCarbohydrates: 0gFiber: 0gSugar: 0gProtein: 6g
Nutrition info is an estimate based on typical ingredients and portions - I calculate these to give you a helpful starting point! For specific dietary needs or accurate counts, I recommend double-checking with your favorite nutrition app or talking to a health professional. You can read more about my approach to nutrition info at notetherecipe.com/disclaimer
Ingredients You’ll Need:
- 900g pork back fat (coarse grind, 8mm plate)
- 900g lean beef (fine grind, 4.5mm plate)
- 700g lean pork (coarse grind, 8mm plate)
- 62.5g kosher salt (2.5%)
- 6.25g Cure #2 (0.25%) — this is essential for safety
- 8g whole black peppercorns (0.32%)
- 3.5g garlic powder or 10g fresh minced garlic
- 7.5g dextrose (0.3%) — yes, there’s a tiny bit of sugar but it feeds the good bacteria
- 75ml red wine, chilled (about 3% by weight)
- Starter culture (T-SPX recommended)
- Natural hog casings (50-60mm)
The Step-by-Step Process:
Day 1 – Mixing and Stuffing:
- Chill your meat and fat until they’re almost frozen — this makes grinding so much easier. Trust me, room temperature meat will turn to mush.
- Grind the beef and pork through a fine plate, then the pork fat through a coarser one. Keep everything super cold.
- Mix your ground meats with the salt, Cure #2, peppercorns, garlic, and dextrose in a chilled bowl. I put mine in the freezer for 10 minutes first.
- Hydrate your starter culture in distilled water (follow the package directions) and add it with the chilled red wine.
- Mix everything until it gets sticky and holds together — about 3-5 minutes. Your hands will be freezing but it’s worth it!
- Stuff into casings, making 12-16 inch lengths. Tie them off well — nothing worse than a salami that falls apart.
- Prick any air bubbles with a sterilized needle. Don’t skip this or you might get unwanted bacteria pockets.
Days 2-4 – Fermentation:
Keep them at 68-75°F with 85-90% humidity for 48-72 hours. You want the pH to drop to about 5.0-5.3. If you don’t have a pH meter, don’t worry — the salami will feel firmer and smell tangy when it’s ready.
Days 5-31 – Drying and Aging:
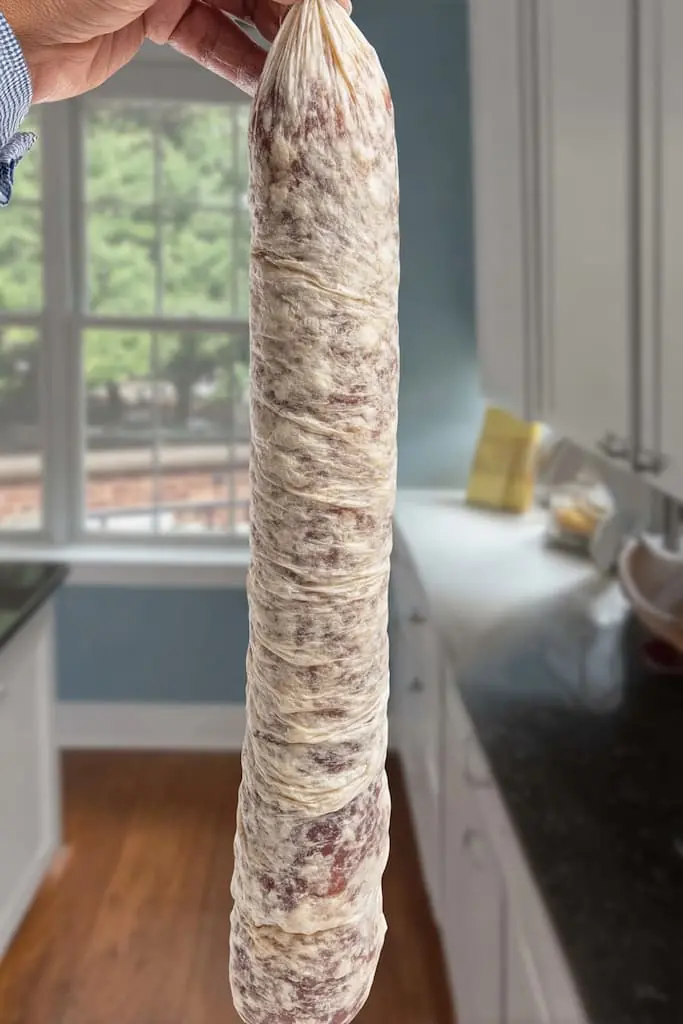
Move them to a cooler spot (54-57°F) with 75-80% humidity. This is where the magic happens! That white mold that develops? It’s your friend — it protects the salami and adds flavor. Only wipe it off if you really can’t stand the look.
Weigh your salamis weekly. They’re done when they’ve lost about 35-42% of their starting weight. Mine took exactly 31 days.
Important Safety Note: Always use Cure #2 (not Cure #1) for dry-cured meats. It contains sodium nitrite and sodium nitrate, which prevent dangerous bacteria growth during the long curing process. Never skip this ingredient — food safety isn’t worth the risk!
Is Genoa Salami Really Keto-Friendly?
Absolutely! With less than 1 gram of carbs per serving, Genoa salami is one of my go-to keto proteins. Even my homemade version, which includes a tiny bit of dextrose for fermentation, ends up with minimal carbs since the bacteria consume most of the sugar during curing.
What I love most is how versatile it is. Some mornings when I’m rushing to get the kids to school, I’ll grab a few slices with some cheese for a quick breakfast. It’s way better than skipping meals, which I used to do all the time.
How Genoa Salami Compares to Other Deli Meats
Genoa Salami vs Hard Salami: Both are keto-friendly, but hard salami has slightly more carbs — about 0.5-1g per ounce. My family prefers Genoa because it’s softer and less intensely flavored.
Genoa Salami vs Turkey: Turkey breast has virtually no carbs but also very little fat. While I need to add mayo or cheese to make turkey work for keto, Genoa salami is perfect straight from the package.
Genoa Salami vs Ham: Watch out here! Many hams have added sugars that bump up the carbs to 2-3g per serving, so always check those labels.
Smart Ways to Enjoy Genoa Salami on Keto
After years of keto cooking (and now making my own salami), these are my favorite ways to use it:
Quick Roll-Ups: Spread cream cheese on a slice, add a pickle spear, and roll it up. Takes 30 seconds and tastes amazing. This is basically how I make my keto salami roll-ups that everyone raves about.
Salami Chips: Microwave slices for 60-90 seconds until crispy. They’re like keto crackers! My kids actually request these for movie night now.
Antipasto Salad: Chop it up with mozzarella, olives, and peppers. Toss with olive oil and vinegar. Dinner is done in 5 minutes.
Pizza Alternative: Layer slices with mozzarella and low-carb marinara, then bake at 400°F for 5 minutes. It satisfies that pizza craving without the carb crash.
Watch Out for Hidden Carbs
Here’s something I learned the hard way — not all Genoa salami is created equal. Some brands add dextrose or corn syrup during processing, which can bump up the carbs.
Always check the label for:
- Added sugars or sweeteners
- Starch fillers
- Dextrose (beyond what’s needed for fermentation)
Stick with brands that list just meat, salt, spices, and natural fermentation cultures. Boar’s Head and Applegate are two brands I trust when I can’t get to my favorite local deli — or when my homemade batch runs out!
You Might Also Like
Storing Your Genoa Salami
Since I buy in bulk (or make huge batches), proper storage matters. Once opened, wrap store-bought salami tightly in plastic wrap or put it in an airtight container. It’ll last 3-4 weeks in the fridge.
For homemade salami, once it’s fully cured, you can wrap it in butcher paper and it’ll continue aging in the fridge for months, getting even better with time. Just slice off any dried edges before serving.
If you buy a whole salami, you can freeze portions for up to 2 months. Just slice what you need for the week and freeze the rest. Trust me, having backup salami in the freezer has saved many rushed dinners!
Frequently Asked Questions
Genoa salami is specifically made with pork and beef (or just pork), contains whole peppercorns, and has a softer texture. Regular salami is a broader term that includes many varieties with different meats and spice blends. The fermentation process for Genoa also creates that distinctive tangy flavor.
Yes! It’s fully cured and ready to eat straight from the package. That’s what makes it such a perfect grab-and-go keto snack. Even homemade salami is safe to eat once properly cured — the fermentation and drying process makes it shelf-stable.
About 0.2 grams of carbs in 2 standard slices (18g total). It’s so low you barely need to count it in your daily totals. Even if you eat 6 slices, you’re still under 1 gram of carbs!
If you love salami and have the patience, absolutely! The flavor is incredible, you control every ingredient, and it’s actually fun once you get the hang of it. Plus, the look on people’s faces when you say you made it yourself? Priceless. Just start with one small batch to test your setup first.
The Bottom Line
Genoa salami is absolutely keto-friendly with less than 1 gram of carbs per serving. It’s become one of my most reliable keto foods — whether I’m buying it from the deli or slicing up my homemade batch.
Whether you’re making roll-ups, adding it to salads, or just eating it straight from the package (no judgment here!), Genoa salami makes keto easier and more delicious. And if you’re feeling adventurous, trying your hand at making it yourself is an amazing kitchen project that’ll impress everyone you know. Ready to try those irresistible keto salami roll-ups? They’re my family’s favorite way to enjoy this versatile meat!