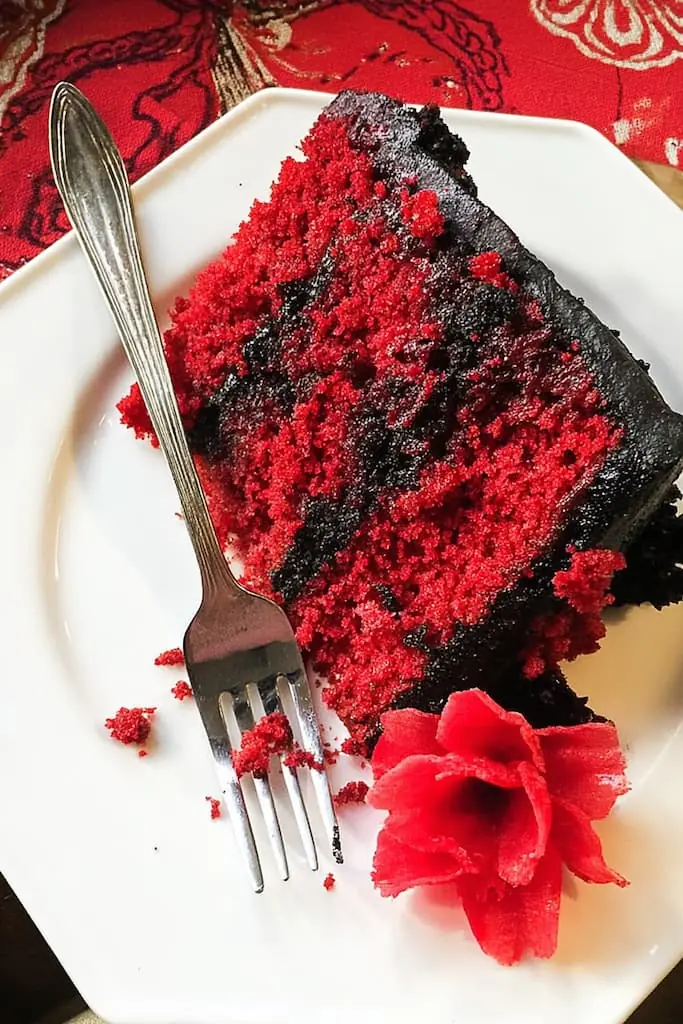
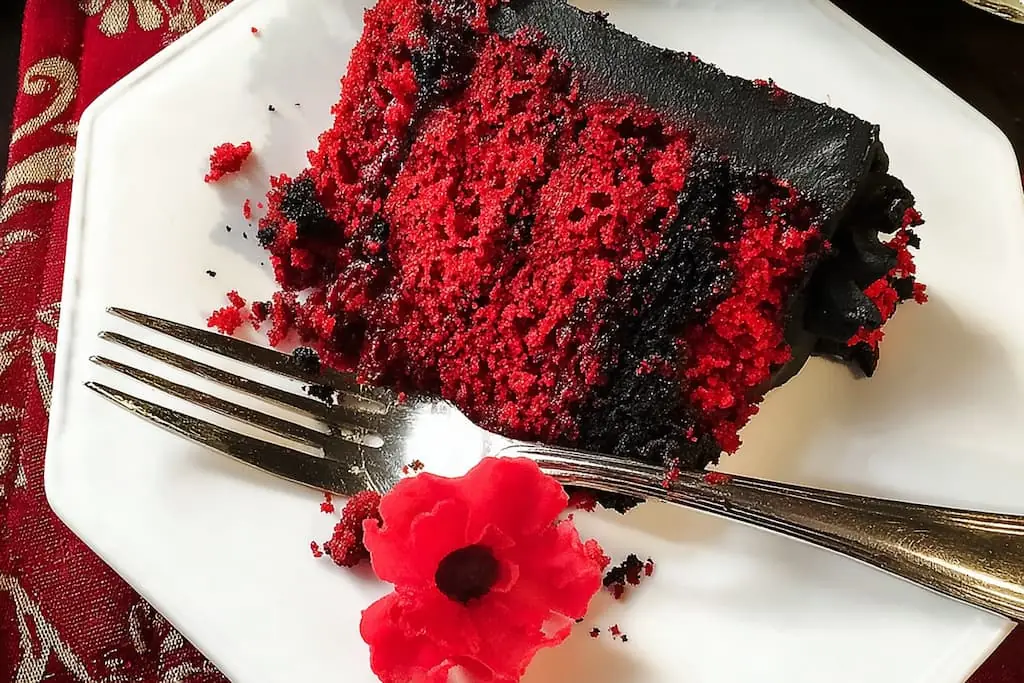
I discovered this gothic Halloween cake recipe during one of those late-night Netflix marathons. I was watching The Haunting of Hill House, feeling all spooky and inspired, when I suddenly craved something dark and dramatic for my upcoming Halloween party. This red velvet beauty with jet-black buttercream turned out even more stunning than I imagined, and trust me, it tastes just as incredible as it looks!
Key Takeaways
- The gothic Halloween cake features red velvet layers with black buttercream for a dramatic effect.
- Gather essential ingredients like all-purpose flour, black cocoa powder, and red food coloring.
- Follow step-by-step instructions including preparing the batter, baking, and decorating the cake.
- Make the cake ahead for better flavor and chill after frosting for cleaner decorating.
- Store at room temperature or refrigerate, but this cake tastes best the next day.
Estimated reading time: 6 minutes
Table of contents

Gothic Halloween Cake That's Hauntingly Delicious
This dramatic red velvet cake with black cocoa buttercream creates the perfect spooky centerpiece for Halloween parties and gothic celebrations.
Ingredients
- 2 ½ cups all-purpose flour
- 2 cups granulated sugar
- 1 tsp baking soda
- 1 tsp salt
- 1 tsp cocoa powder
- 1 ½ cups vegetable oil
- 1 cup buttermilk, room temperature
- 2 large eggs
- 2 tbsp red food coloring
- 1 tsp white vinegar
- 2 tsp vanilla extract
- 1 ½ cups unsalted butter, softened
- 4 cups powdered sugar, sifted
- ¾ cup black cocoa powder
- 3-4 tbsp heavy cream
- 2 tsp vanilla extract for frosting
- Pinch of salt
- Black gel food coloring, optional
- Red edible wafer paper flowers
- Gold dragees for decoration
Instructions
- Preheat oven to 350°F and grease two 9-inch round cake pans.
- Whisk together flour, sugar, baking soda, salt, and cocoa powder.
- Beat oil, buttermilk, eggs, food coloring, vinegar, and vanilla until smooth.
- Slowly mix dry ingredients into wet mixture until just combined.
- Divide batter between pans and bake 30-35 minutes until toothpick comes out clean.
- Cool completely before frosting.
- Beat butter until fluffy, about 3 minutes.
- Gradually add powdered sugar and cocoa powder, mixing well.
- Add cream, vanilla, salt, and black food coloring if desired.
- Level cakes and stack with buttercream between layers.
- Apply crumb coat and chill 20 minutes.
- Pipe decorative borders and add red flowers and gold accents.
Notes
- Black cocoa powder gives the deepest color - find it at baking supply stores
- Room temperature ingredients blend better for smooth batter
- Chill between frosting steps for cleaner decorating
- Store covered at room temperature up to 3 days
Nutrition Information:
Yield:
12Serving Size:
1Amount Per Serving: Calories: 485Total Fat: 22gSaturated Fat: 10gTrans Fat: 0gUnsaturated Fat: 12gCholesterol: 110mgSodium: 384mgCarbohydrates: 98gFiber: 2gSugar: 62gProtein: 6g
Nutrition info is an estimate based on typical ingredients and portions - I calculate these to give you a helpful starting point! For specific dietary needs or accurate counts, I recommend double-checking with your favorite nutrition app or talking to a health professional. You can read more about my approach to nutrition info at notetherecipe.com/disclaimer
What You’ll Need
Here’s everything you need to create this dramatic Halloween showstopper:
- 2 ½ cups all-purpose flour
- 2 cups granulated sugar
- 1 tsp baking soda
- 1 tsp salt
- 1 tsp cocoa powder
- 1 ½ cups vegetable oil
- 1 cup buttermilk, room temperature
- 2 large eggs
- 2 tbsp red food coloring
- 1 tsp white vinegar
- 2 tsp vanilla extract
- 1 ½ cups unsalted butter, softened
- 4 cups powdered sugar, sifted
- ¾ cup black cocoa powder
- 3-4 tbsp heavy cream
- Black gel food coloring (optional)
- Red edible wafer paper flowers
- Gold dragees for decoration
- Two 9-inch round cake pans
- Electric mixer
- Piping bags and tips
Detailed Cooking Instructions
Time needed: 1 hour and 20 minutes
Step-by-step instructions for making a gothic Halloween cake with red velvet layers and black buttercream.
- Prepare cake batter
Preheat oven to 350°F and grease two 9-inch pans. Whisk dry ingredients, then combine wet ingredients and mix together until just combined.
- Bake the cakes
Divide batter between prepared pans and bake 30-35 minutes until toothpick comes out clean. Cool completely.
- Make black buttercream
Beat softened butter until fluffy. Gradually add powdered sugar, cocoa powder, cream, vanilla, and salt until smooth and dark.
- Assemble and decorate
Level cakes, stack with buttercream, apply crumb coat, chill 20 minutes, then pipe decorative borders and add red flowers and gold accents.
Tips & Tricks
- Black cocoa powder is the secret to that deep, dramatic color – regular cocoa won’t give you the same effect.
- Room temperature buttermilk and eggs mix much better, so pull them out about 30 minutes before baking.
- Don’t skip the chilling step after your crumb coat – it makes decorating so much cleaner and easier.
- If your buttercream looks too stiff, add cream one tablespoon at a time until it’s pipeable.
- Make the cake layers a day ahead and wrap them well – they actually taste better after resting overnight.
- If you’re planning a full Halloween spread, try pairing this with my fluffy protein muffins for a lighter morning treat before the evening festivities.
- I always tell people this cake is indulgent but worth it – nutrition data shows red velvet cake typically contains around 420 calories per serving with about 60g of carbohydrates, so it’s definitely a special occasion treat that brings joy to any celebration.
You Might Also Like
Frequently Asked Questions
Black cocoa powder is ultra-Dutch processed cocoa that gives a deep, dark color. Find it at baking supply stores or online – Oreo cookies use this type of cocoa.
Yes! Bake the cake layers up to 2 days ahead and wrap tightly. The frosted cake keeps at room temperature for 3 days or refrigerated for up to a week.
Use regular dark cocoa powder and add black gel food coloring gradually until you get the desired color. It won’t taste exactly the same but will still look dramatic.
Use a large serrated knife to level your cooled cakes, and take your time. A cake leveler tool also works great if you have one.
Variations & Add-Ins
- Add 1 cup mini chocolate chips to the batter for extra richness and texture.
- Swap the red food coloring for purple or deep blue for different gothic vibes.
- Try cream cheese frosting tinted black for a tangier flavor profile.
- Add a tablespoon of espresso powder to intensify the chocolate flavor.
- Use raspberry or strawberry jam between layers for a pop of flavor contrast.
- For a completely different dessert experience, check out my strawberry crunch cheesecake – it has that same dramatic presentation but with a lighter flavor profile.
Dietary Notes
| Diet | Friendly? | Adjustments |
|---|---|---|
| Gluten-Free | No | Use 1:1 gluten-free flour blend |
| Dairy-Free | No | Swap butter for vegan butter, use plant-based milk |
| Vegan | No | Use flax eggs, vegan butter, plant milk |
| Keto | No | Not suitable due to high carb content |
| Nut-Free | Yes | Already nut-free as written |
Storage, Freezing & Reheating
- Room Temperature: According to USDA food safety guidelines, perishable foods like frosted cake should not be left out for more than 2 hours at room temperature – but this cake with its buttercream holds up well for up to 3 days when covered.
- Refrigerator: Store covered for up to 1 week, but let it come to room temperature before serving for best flavor.
- Freezer: Wrap unfrosted cake layers tightly for up to 3 months, or freeze whole frosted cake for up to 1 month.
- Thawing: Move frozen cake to the fridge overnight, then let it reach room temperature before serving.
- Serving: This cake actually tastes better the day after making – the flavors have time to meld together beautifully.
Save This Recipe for Later
This gothic Halloween cake is definitely a showstopper that you’ll want to make again and again! If you’re hosting a full Halloween dinner, don’t forget to serve my honey butter skillet cornbread alongside your main course – it’s the perfect comfort food to balance out all that spooky sweetness. Save this recipe to your Pinterest board or share it with someone who loves dramatic, delicious desserts.
Pin it here