When I first started making keto roll ups, I thought it would be simple. Just roll some meat around cream cheese, right? Wrong! After countless failed attempts that fell apart or tasted bland, I finally figured out the secrets to perfect roll-ups every time. Trust me, once you know these tricks, you’ll be making restaurant-quality keto roll ups in your own kitchen without any of the frustration I went through.
Table of contents
- What Makes Roll-Ups Actually Work
- Choosing Your Base: The Best Meats for Roll-Ups
- The Filling Game-Changer
- Assembly Technique That Prevents Disasters
- My Family’s Favorite: Keto Pizza Roll-Ups
- Troubleshooting Common Problems
- Air Fryer Method for Pizza Roll-Ups
- Make-Ahead Magic for Busy Families
- More Kid-Friendly Variations That Actually Work
- Weight Loss Benefits of Keto Roll-Ups
- Storage Tips That Keep Roll-Ups Fresh
- Serving Ideas That Impress
- The Bottom Line on Perfect Roll-Ups
- Frequently Asked Questions
- You Might Also Like
What Makes Roll-Ups Actually Work
The difference between roll-ups that hold together beautifully and ones that fall apart on your plate comes down to three key factors: the right meat-to-filling ratio, proper assembly technique, and letting them set properly. I learned this the hard way when my first batch for a neighborhood potluck completely unraveled – talk about embarrassing!
Most people make the mistake of overfilling their roll-ups or using meats that are too thick. The perfect keto roll up uses thin, flexible deli meat with just enough filling to add flavor without overwhelming the structure.
Choosing Your Base: The Best Meats for Roll-Ups
After testing dozens of different deli meats, I’ve found that some work way better than others for keto roll ups. Here’s what actually works:
Best Options:
- Salami (my personal favorite) – flexible and flavorful
- Turkey – mild taste, pairs with everything
- Ham – naturally salty, great with cream cheese
- Prosciutto – delicate but holds well when handled gently
Skip These:
- Thick-cut anything – too rigid to roll properly
- Pepperoni slices – usually too small and oily
- Roast beef – tends to tear when rolling
I always ask the deli counter to slice my meat at setting 2 or 3 – thin enough to be flexible but not so thin it tears when you look at it wrong.
The Filling Game-Changer
Here’s where most people go wrong with their keto roll ups recipe – they either use plain cream cheese (boring!) or they go overboard with complicated mixtures that mask the meat’s flavor.
My Go-To Base Formula:
- 8 oz cream cheese (room temperature – this is crucial!)
- 1-2 tablespoons of flavor enhancer
- Pinch of salt and pepper
Flavor Enhancers That Actually Work:
- Fresh herbs (chives, dill, or parsley)
- Garlic powder (not fresh – it can make things watery)
- Everything bagel seasoning (my kids’ favorite)
- Ranch powder (mix it dry into the cream cheese)
The secret I learned from my neighbor is to let your cream cheese come to room temperature for about 30 minutes before mixing. Cold cream cheese creates lumps that make spreading nearly impossible.
Assembly Technique That Prevents Disasters
I used to just slap filling on meat and hope for the best. Now I follow a specific process that gives me perfect easy keto roll ups every single time:
1: Set Up Your Station Lay out a clean kitchen towel, have a small spoon ready, and make sure your meat is at room temperature (take it out of the fridge 10-15 minutes before assembly).
2: The Spreading Method
- Use about 1 tablespoon of filling per slice of meat
- Spread it evenly, leaving a ¼-inch border on all sides
- Don’t over-fill – more isn’t better here
3: The Rolling Technique
- Start from the narrower end of the meat slice
- Roll slowly and firmly (but not too tight)
- The filling should stay contained without squishing out
4: The Setting Secret This is the step most people skip, and it’s why their roll-ups fall apart. Place your finished rolls seam-side down on a plate and refrigerate for at least 30 minutes. This lets everything firm up and stick together.
My Family’s Favorite: Keto Pizza Roll-Ups
Now let me share the recipe that got my kids completely hooked on keto italian pinwheels – these keto pizza roll ups! I developed this after my 8-year-old kept asking for “pizza but not pizza” during our first month of keto. These disappeared so fast the first time I made them that I barely got a photo of the last four pieces.
What makes these special: They satisfy that pizza craving without any of the carbs, and they’re actually easier than making regular pizza. Plus, you can eat them with your hands – always a win in my house.
Keto Pizza Roll-Ups Recipe

Keto Pizza Roll-Ups
Crispy, cheesy pizza roll-ups with zero carbs from crust! Perfect for satisfying pizza cravings on keto.
Ingredients
- 8-10 slices mozzarella cheese (rectangular deli slices)
- 2-3 slices muenster cheese (optional)
- 20-25 pepperoni slices
- 1 teaspoon Italian seasoning
- 1/2 cup marinara sauce (for dipping)
Instructions
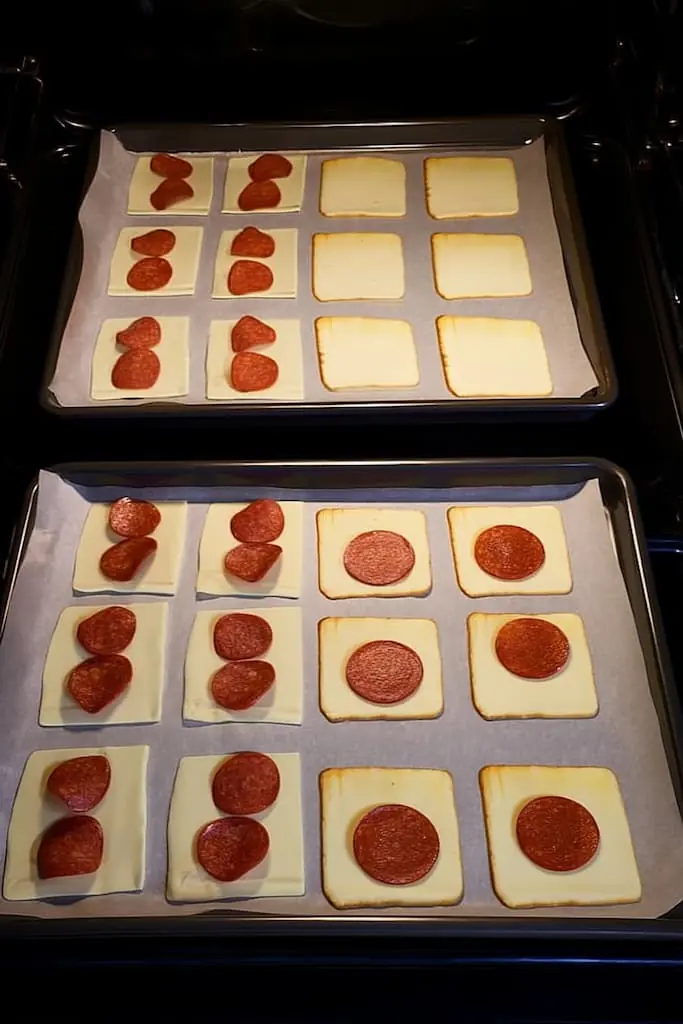
- 1. Preheat oven to 400°F and line baking sheet with parchment paper.
2. Arrange cheese slices flat on parchment paper, mixing mozzarella and muenster.
3. Top each cheese slice with 2-3 pieces of pepperoni.
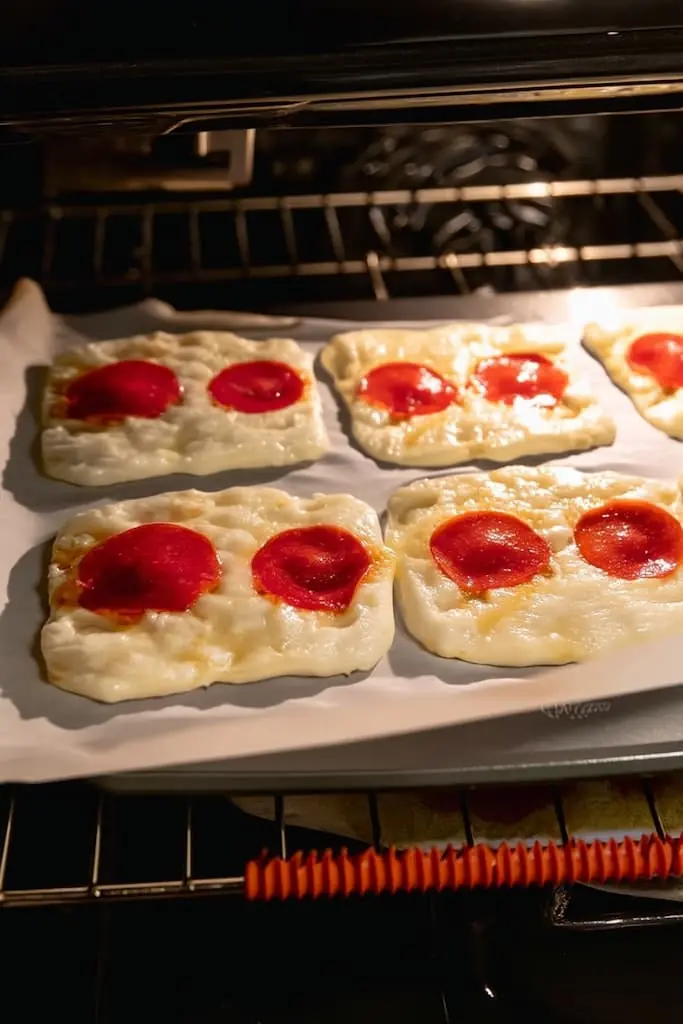
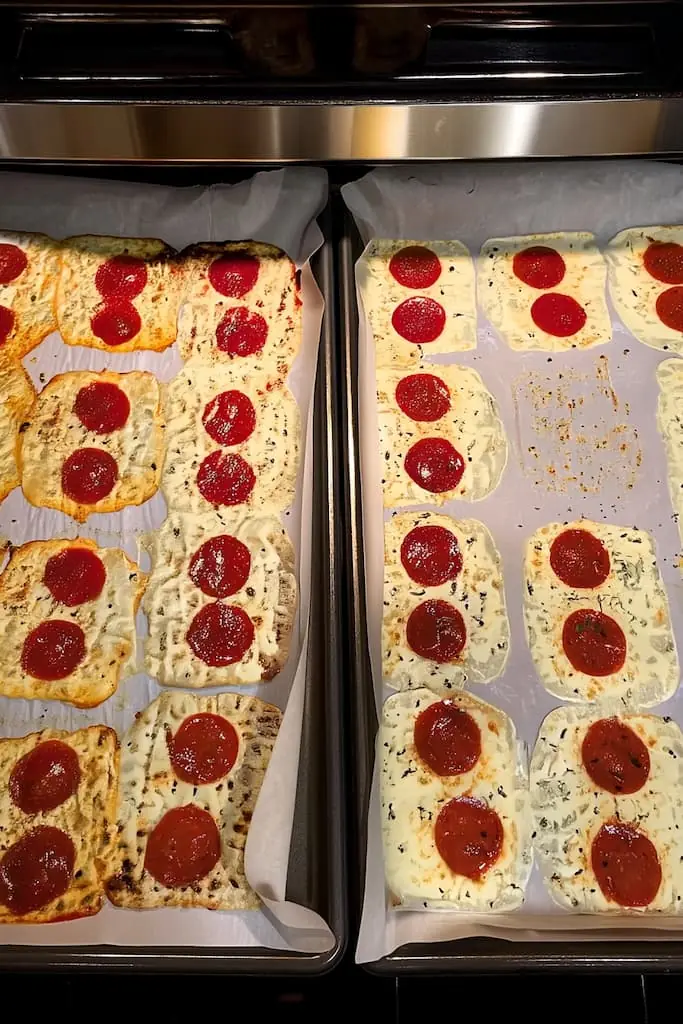
4. Bake 7-8 minutes until cheese is melted and slightly golden.
5. Cool for 1 minute, then sprinkle with Italian seasoning.
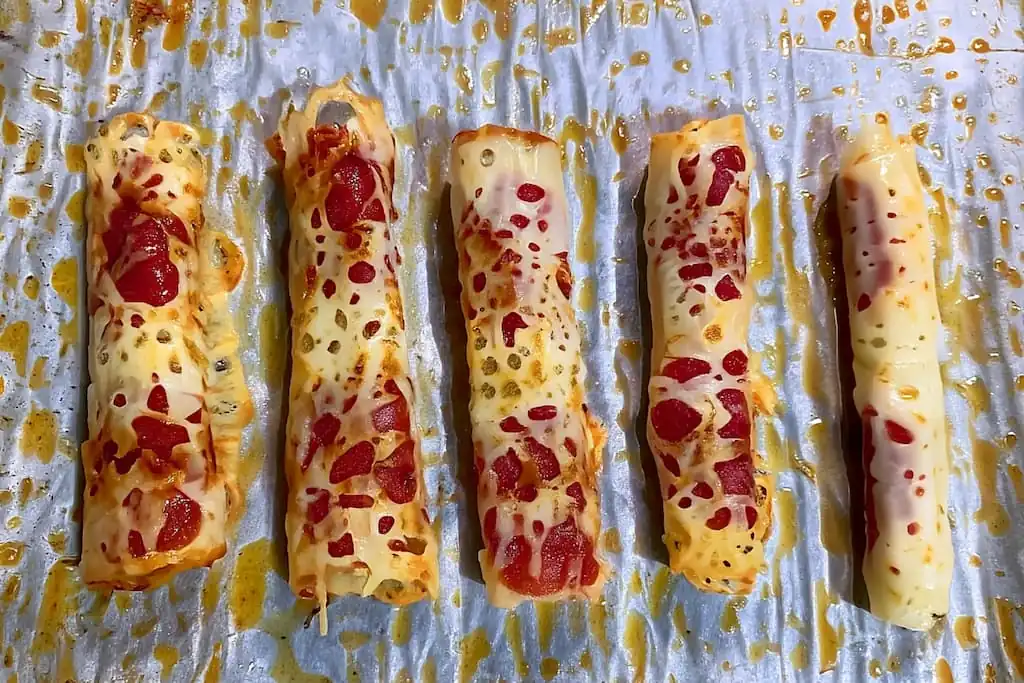
6. Roll each cheese slice up tightly while still warm and pliable.
7. Serve immediately with marinara sauce for dipping.
Notes
- Don't let them cool too long or cheese gets too firm to roll.
- Watch closely after 6 minutes - every oven is different.
- For air fryer: Cook at 375°F for 4-5 minutes.
- Best eaten fresh - store leftovers up to 2 days in fridge.
Nutrition Information:
Yield:
10Serving Size:
1Amount Per Serving: Calories: 85Total Fat: 6gSaturated Fat: 4gTrans Fat: 0gUnsaturated Fat: 2gCholesterol: 22mgSodium: 215mgCarbohydrates: 1gFiber: 0gSugar: 1gProtein: 6g
Nutrition info is an estimate based on typical ingredients and portions - I calculate these to give you a helpful starting point! For specific dietary needs or accurate counts, I recommend double-checking with your favorite nutrition app or talking to a health professional. You can read more about my approach to nutrition info at notetherecipe.com/disclaimer
My Pro Tips:
- Don’t let them cool too long or the cheese gets too firm to roll
- If you’re making these for a party, you can prep everything ahead and just pop them in the oven when guests arrive
- My kids like them plain, but adults usually prefer the marinara dip
Storage: These keep in the fridge for 2 days, but honestly, they never last that long in our house. You can reheat them in the microwave for 15-20 seconds, but they’re best fresh.
This recipe answers the common question “Is keto pizza good for weight loss?” – absolutely! Each roll-up has less than 2 carbs compared to regular pizza rolls that can have 15+ carbs each.
Troubleshooting Common Problems
Let me save you from the mistakes I made when I was learning how to make perfect low carb roll ups:
Roll-ups fall apart when you pick them up Solution: You’re either using too much filling or not letting them set long enough. Try using less filling and chill for a full hour.
Filling squishes out the sides Solution: Leave bigger borders when spreading, and don’t roll too tightly. Think gentle but firm pressure.
Meat tears during rolling Solution: Your meat is either too cold or sliced too thin. Let it warm up a bit and ask for slightly thicker slices next time.
Bland flavor Solution: Don’t be afraid to season your cream cheese mixture! It needs more flavor than you think to shine through the meat.
Pizza roll-ups get too crispy Solution: Watch them closely after 6 minutes – every oven is different, and the cheese can go from perfect to overcooked quickly.
Air Fryer Method for Pizza Roll-Ups
Since so many people ask about keto pizza roll ups air fryer methods, I finally tested it. Here’s what works:
Air Fryer Instructions:
- Preheat air fryer to 375°F
- Follow the same assembly method
- Cook for 4-5 minutes (watch closely!)
- Let cool 30 seconds before rolling
The air fryer actually works great for small batches, and you get an even crispier result. Just don’t walk away – they can go from perfect to burnt in about 30 seconds.
Make-Ahead Magic for Busy Families
One of the best things about meat roll up recipes is how well they keep. I often make a big batch on Sunday for the week ahead. Here’s how to do it right:
Same-Day Serving:
- Assemble 2-4 hours ahead
- Cover with plastic wrap
- Keep refrigerated until ready to serve
Weekly Meal Prep:
- Make up to 3 days ahead (except pizza roll-ups – make those fresh)
- Store in airtight containers with parchment between layers
- They actually taste better after sitting overnight
Freezing (Yes, It Works!):
- Freeze individual roll-ups on a baking sheet first
- Transfer to freezer bags once solid
- Thaw in the fridge overnight before serving
More Kid-Friendly Variations That Actually Work
Beyond the pizza roll-ups, these variations have won over my kids and their friends:
“Ranch” Roll-Up:
- Any mild meat
- Cream cheese with ranch powder
- Finely diced cucumber for crunch
“Taco” Roll-Up (inspired by keto taco roll ups):
- Ham or turkey base
- Cream cheese mixed with taco seasoning
- Tiny bits of shredded cheese and lettuce
“Sweet” Roll-Up:
- Ham base
- Cream cheese with a tiny bit of honey (still keto-friendly in small amounts)
- Works great for picky eaters
Weight Loss Benefits of Keto Roll-Ups
People often ask “Can you lose 20 pounds in 2 months on keto?” While I can’t make specific weight loss promises, I can tell you that these meat and cheese roll ups no bread have been game-changers for my family’s keto journey.
Each serving typically has:
- 2-4 grams of carbs (depending on filling)
- 15-20 grams of protein
- 10-15 grams of healthy fats
According to the USDA FoodData Central, mozzarella cheese contains only 2.2g carbs per 100g serving, while muenster has even fewer at just 1.14g carbs per 100g. Harvard’s Nutrition Source confirms that the ketogenic diet typically limits carbs to 20-50g daily, making these cheese choices perfect for staying in ketosis.
This combination helps keep you full between meals, which naturally supports weight management goals. The key is that they satisfy cravings without derailing your keto macros.
Storage Tips That Keep Roll-Ups Fresh
I learned these storage tricks after a few batches went soggy on me:
- Always use parchment paper between layers if stacking
- Don’t cover too tightly – you want some air circulation
- Eat within 3 days for best texture and food safety
- Pat dry any condensation before serving leftovers
The FDA recommends storing deli meats like pepperoni in the refrigerator at 40°F or below and using opened packages within 3-5 days for food safety. I always follow the USDA’s guidelines for leftovers – these roll-ups should be eaten within 3 days and reheated to 165°F if you’re warming them up.
Special note for pizza roll-ups: These are best eaten the day you make them. The cheese can get a bit tough if stored too long.
Serving Ideas That Impress
These keto roll ups aren’t just snacks – I’ve served them at parties where even non-keto guests went back for seconds:
Parties:
- Cut into pinwheels and arrange on a platter
- Serve pizza roll-ups alongside traditional roll-ups for variety
- Add colorful veggie sticks for contrast
Lunches:
- Pack with cherry tomatoes and cucumber
- Include a small container of ranch or marinara for dipping
- Add some nuts for extra crunch
Quick Dinners:
- Serve over salad greens
- Pair with soup for a filling meal
- Add avocado slices for healthy fats
The Bottom Line on Perfect Roll-Ups
After making hundreds of these over the years, I can tell you that perfect keto roll ups come down to quality ingredients, proper technique, and patience. Don’t rush the setting time, don’t overfill, and don’t be afraid to experiment with flavors.
If you’re looking for more specific recipes to start with, my keto salami roll-ups are always a hit at our house – they use all these techniques and have become our go-to for everything from after-school snacks to party appetizers. You’ll also want to check out my guide to the best cream cheese flavors for keto roll-ups to really elevate your game.
Frequently Asked Questions
Yes! Try mashed avocado with lime juice, or even hummus if you’re not strictly keto. For the pizza roll-ups, you don’t need any filling at all – the cheese and pepperoni are perfect on their own.
I always use mine within 3 days. After that, the meat can get a bit slimy and the filling starts to separate. Pizza roll-ups are best eaten fresh.
Use a very sharp knife and cut in one clean motion – don’t saw back and forth. Wipe the knife clean between cuts to prevent dragging filling around.
Traditional pizza rolls can have 15+ carbs each! My keto pizza roll ups have less than 2 carbs per roll-up, making them perfect for staying in ketosis.
Besides these roll-ups, you can use cauliflower crust, fathead dough, or portobello mushroom caps. But honestly, when I’m craving pizza, these roll-ups satisfy that craving faster and easier than any crust substitute.
Absolutely! Keto pizza roll ups tortilla versions work great too. Just use the lowest carb tortillas you can find, spread with cream cheese, add your pizza toppings, and roll up. The technique is the same.
You Might Also Like
According to Johns Hopkins Medical Center, the ketogenic diet typically consists of 75% fat, 20% protein, and only 5% carbohydrates. Cleveland Clinic notes that this low-carb approach can help the body enter ketosis, where it burns fat for fuel instead of carbs.
Remember, whether you’re making traditional cream cheese roll-ups or these pizza versions, the key to mastering any keto roll ups recipe is practice. Start with simple flavor combinations and work your way up to more complex ones as you get comfortable with the technique. You’ve got this!