I’ve been making these keto salami roll-ups for about three years now, and they’ve honestly saved me more times than I can count. It all started when I was scrambling to pack snacks for my kids’ school field trip and realized I had nothing keto-friendly that would actually travel well in New Orleans heat.
After testing this recipe probably 20 times with my family, I can tell you these little roll-ups are pure magic. My 12-year-old calls them “fancy roll-ups” and my 8-year-old sneaks extra ones when she thinks I’m not looking. Living in New Orleans taught me that snacks need to hold up in humidity and heat, and these absolutely do.
What makes these special isn’t just that they’re keto-friendly – it’s that they’re genuinely satisfying. The cream cheese gets tangy from the pickles, the salami adds that perfect salty bite, and everything stays together beautifully. Trust me, once you nail the technique, you’ll be making these for everything from lunch boxes to dinner parties.
They’re perfect for busy mornings when you need something that feels fancy but takes less than 10 minutes. I’ve served these at book club, packed them for beach days, and even made a double batch for my neighbor’s baby shower. Whether you’re meal prepping for the week or need a last-minute appetizer, these roll-ups deliver every single time.
Key Takeaways
- Keto Salami Roll-Ups are a versatile snack that takes less than 10 minutes to prepare and is perfect for any occasion.
- Use medium-thick Genoa or hard salami, softened cream cheese, and diced dill pickles for the best results.
- Roll with the right amount of filling, chill before serving, and consider dietary adaptations for various needs.
- Pat pickles dry to prevent sogginess and maintain proper moisture levels for better flavor and texture.
- Store in the fridge for up to 4 days, making them ideal for meal prep and quick snacks.
Estimated reading time: 1 minute
Table of contents
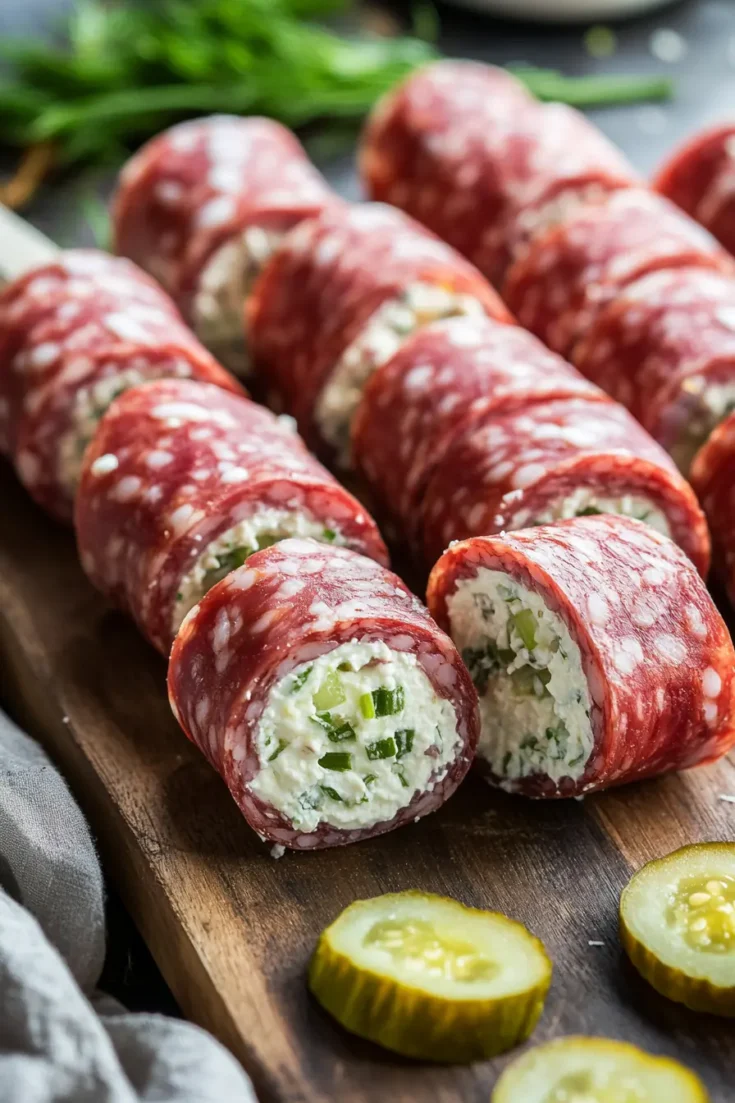
Irresistible Keto Salami Roll-Ups for Easy Snacking
These no-cook keto roll-ups are the perfect make-ahead snack - creamy, tangy, and completely satisfying. My family requests these for everything from lunch boxes to dinner parties!
Ingredients
- 8 slices Genoa or hard salami (medium thickness)
- 4 oz cream cheese, softened
- 2 tablespoons finely diced dill pickles (patted dry)
- 1 tablespoon chopped green onions (optional)
- 1 teaspoon garlic powder or Italian seasoning
Instructions
- In a small bowl, mix softened cream cheese, diced pickles, green onions, and seasoning until well combined.
- Lay salami slices flat on parchment paper.
- Spread about 1 teaspoon of cream cheese mixture on each slice, leaving a small border.
- Roll each slice tightly from one end, applying gentle pressure.
- Secure with toothpicks if needed and chill for 15 minutes before serving.
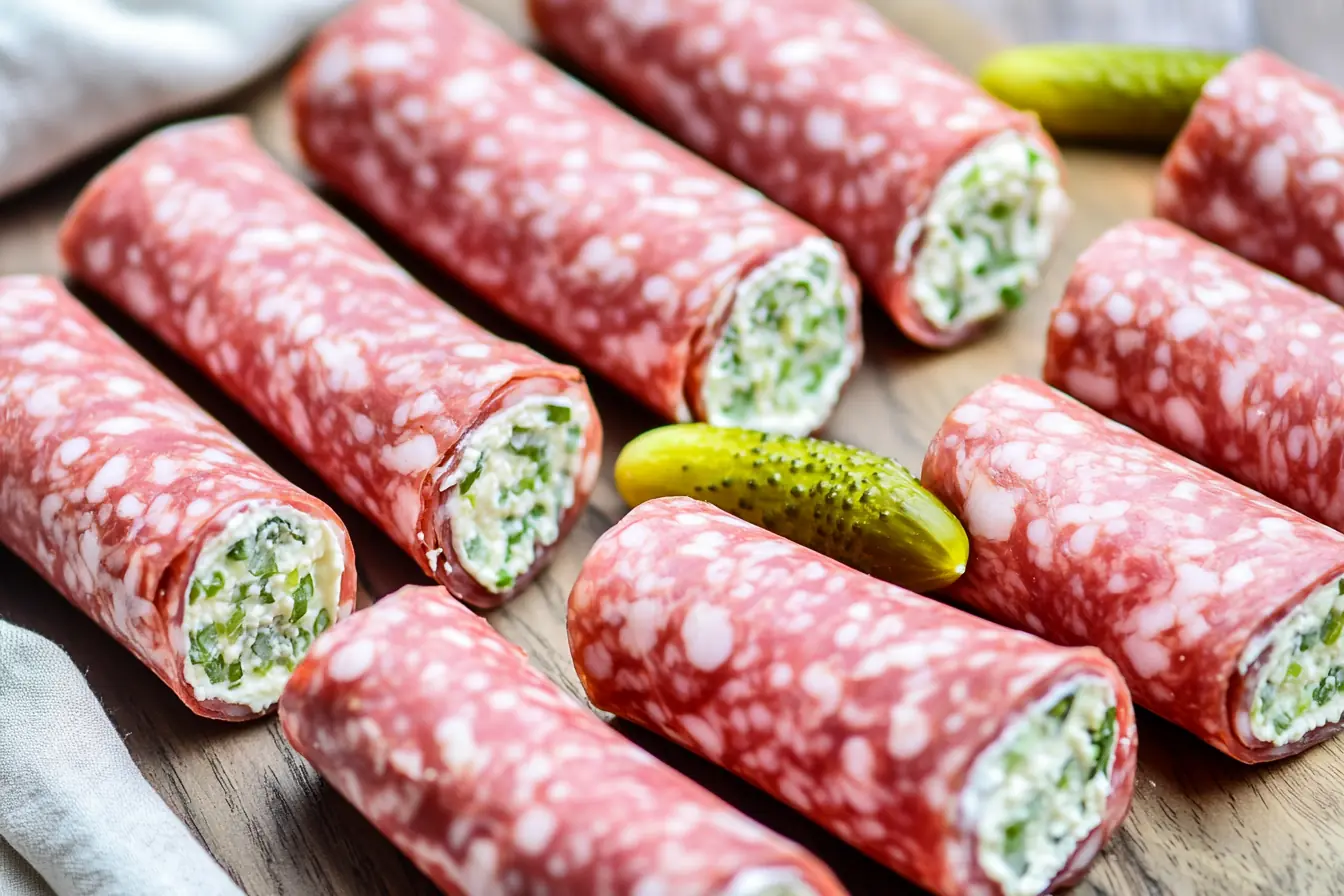
- Serve whole or slice into pinwheels for parties.
Notes
- Pat pickles completely dry to prevent soggy roll-ups
- These keep 4 days in the fridge and actually taste better the next day
- Try different pickle types or add thin cucumber for variation
- Perfect for meal prep and travel well in lunch boxes
Nutrition Information:
Yield:
8Serving Size:
1Amount Per Serving: Calories: 89Total Fat: 8gSaturated Fat: 4gTrans Fat: 0gUnsaturated Fat: 3gCholesterol: 24mgSodium: 229mgCarbohydrates: 1gFiber: 0gSugar: 1gProtein: 5g
Nutrition info is an estimate based on typical ingredients and portions - I calculate these to give you a helpful starting point! For specific dietary needs or accurate counts, I recommend double-checking with your favorite nutrition app or talking to a health professional. You can read more about my approach to nutrition info at notetherecipe.com/disclaimer
My Recipe Development Story
My first attempt at these was a complete disaster. I was trying to recreate some expensive roll-ups I’d seen at a fancy deli, but mine kept falling apart and the filling was way too thick. After that failed batch, I realized I needed to actually understand what makes roll-ups work.
The breakthrough came when I was making them for the fourth time and my daughter suggested using less cream cheese. Sometimes kids are the best kitchen helpers! I also learned that the type of salami matters more than I thought – those paper-thin slices just don’t work.
Living in New Orleans, I had to figure out how to keep these from getting soggy in our humidity. That’s when I discovered the trick of patting pickles completely dry and chilling the roll-ups before serving. Now I make them year-round, even in August when it’s 95 degrees and 90% humidity outside.
I’ve probably made over 200 of these at this point, and I still get excited when I nail the perfect roll. There’s something so satisfying about getting that tight spiral with just the right amount of filling. My family requests these for everything now – school lunches, movie nights, even as appetizers when we have friends over.
Complete Ingredient Guide
Let me walk you through each ingredient because getting the right ones makes all the difference. I’ve tested different brands and types, and some definitely work better than others.
For the salami, I always use Genoa or hard salami sliced medium-thick. Those super-thin deli slices tear too easily, and thick ones don’t roll properly. I’ve had great luck with Boar’s Head and Applegate brands – they stay flexible and have great flavor. Don’t use pepperoni though – I learned that the hard way when everything tasted like pizza.
The cream cheese needs to be properly softened, not melted. I take mine out about 30 minutes before making these, or if I forget, I microwave it for 10 seconds. In New Orleans humidity, it softens faster, so sometimes 15 minutes is enough. Philadelphia brand works perfectly, but I’ve also used store brands with good results.
For pickles, I prefer dill pickle spears cut into small dice. The juice adds tang, but too much makes everything soggy. I always pat the diced pickles with paper towels – this was a game-changer for me. Sweet pickles work too if you prefer them, but my kids definitely prefer the dill version.
Green onions are optional but add a nice fresh bite. I use just the green parts and chop them super fine. If you don’t have them, chives work great too. Sometimes I skip them entirely when I’m in a hurry, and the roll-ups are still delicious.
For seasonings, garlic powder is my go-to, but Italian seasoning works beautifully too. Start with less than you think you need – you can always add more. I learned this when I made a batch that was way too garlicky for my 8-year-old.
When shopping, look for salami that feels sturdy but not stiff. It should bend without cracking. Store everything in the fridge until you’re ready to make these – cold ingredients work much better than room temperature ones.
Master the Technique

Here’s what I wish someone had told me when I started making these: the rolling technique matters way more than you’d think. After ruining my first few batches, I developed a system that works every single time.
Start with completely dry surfaces. I lay out parchment paper and pat everything dry with paper towels. Even a little moisture makes the salami slippery and hard to roll. This is especially important in New Orleans where everything gets damp just from existing.
Use the right amount of filling – about a teaspoon per slice. Too much and it squeezes out the sides, too little and you lose flavor. I spread it in a thin layer, leaving about a quarter-inch border on all sides. Think of it like spreading peanut butter on bread – you want coverage but not thickness.
The rolling motion should be firm but gentle. I start from one end and keep steady pressure as I roll. Don’t worry if your first few look wonky – mine definitely did. You’ll get the hang of it after a few tries, and even the ugly ones taste amazing.
Chill them for at least 15 minutes before serving. This helps everything set and makes them easier to handle. In summer, I sometimes chill them for 30 minutes because our kitchen stays so warm. They actually taste better cold anyway.
If your roll-ups keep unraveling, try securing them with toothpicks until they chill. I do this when I’m making them for events or when my kids are helping – it just makes everything easier. You’ll know you’ve got the technique down when they hold together on their own.
Troubleshooting Common Problems
I’ve made every mistake possible with these roll-ups, so let me save you some frustration. Here are the problems I’ve run into and exactly how I fixed them.
If your roll-ups fall apart, the filling is probably too thick or the salami is too cold. I learned this when I tried to rush and use cream cheese straight from the fridge. Let the cream cheese soften properly, and if your salami feels stiff, let it sit out for 5 minutes before rolling.
Soggy roll-ups happen when there’s too much moisture. This was my biggest problem in New Orleans humidity. Now I always pat the pickles dry with paper towels and make sure my work surface is completely dry. If they still seem soggy, reduce the pickle amount next time.
When the filling squeezes out the sides, you’re using too much. Trust me, I’ve been there – it’s tempting to load them up. But less is definitely more with these. Stick to about a teaspoon per slice and spread it thin.
If they taste bland, you need more seasoning or pickles. My first batch was so boring because I was scared to add enough flavor. Don’t be afraid to taste the cream cheese mixture and adjust. The pickles should add a nice tangy punch.
Rolling problems usually mean the salami is either too thick or too thin. Medium-thickness slices work best – they’re flexible enough to roll but sturdy enough to hold everything together. If your deli counter can’t get it right, try pre-packaged options.
The good news is that even “failed” roll-ups still taste great. My family has eaten plenty of my practice batches, and nobody ever complained!
Complete Dietary Adaptations
I’ve tested these roll-ups for pretty much every dietary need my friends and family have, and most adaptations work really well. Here’s what I’ve learned from actual testing, not just guessing.
For dairy-free versions, I’ve had great success with Kite Hill or Miyoko’s cream cheese alternatives. The texture is a little different – not quite as creamy – but the flavor is still delicious. My friend who’s dairy-free actually prefers the Kite Hill version because it’s less rich.
To make these Whole30 compliant, skip the cream cheese entirely and use mashed avocado with a squeeze of lemon. I was skeptical about this one, but my sister convinced me to try it. It’s surprisingly good, though you need to eat them the same day since avocado browns quickly.
For nut-free options, just check your salami ingredients. Most brands are naturally nut-free, but always read labels. Everything else in this recipe is naturally nut-free, which makes these perfect for school events.
The kid-friendly version gets milder pickles and less seasoning. My 8-year-old prefers sweet pickles instead of dill, and I skip the garlic powder for her batch. Sometimes I make half the batch her way and half the regular way.
For extra protein, I sometimes add a thin slice of cheese inside the roll. Provolone or Swiss work great. This makes them more filling for my teenagers, though they’re not technically keto anymore with the extra carbs.
Don’t expect dairy-free versions to taste exactly the same as the original – they won’t. But they’re still really good in their own way, and I’m happy to have options that work for everyone.
Smart Meal Planning Integration
These roll-ups have become essential in my weekly meal prep routine because they’re so versatile and keep really well. Here’s how I work them into our family’s schedule.
I usually make a big batch every Sunday for the week ahead. They keep perfectly in the fridge for up to 4 days, and having them ready makes busy mornings so much easier. I store them in a glass container with parchment paper between layers.
They pair beautifully with my keto cucumber salad and some mixed nuts for a complete lunch. This combination travels well in lunch boxes and gives the kids (and me) enough variety to stay interested. On weekends, I add them to a cheese and veggie tray for easy snacking.
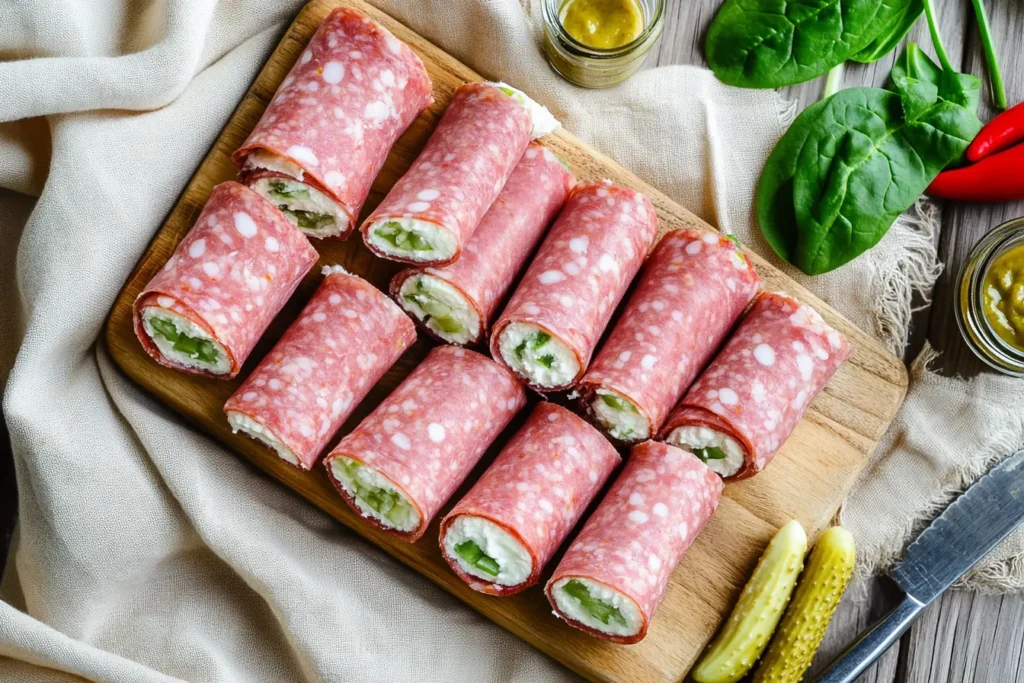
For dinner parties, I make them the morning of and slice them into pinwheels right before serving. This turns them into elegant appetizers that look way fancier than the effort required. I’ve served these at book club and always get recipe requests.
When I’m feeding a crowd, I triple the recipe and set up an assembly line. My kids actually love helping with this – they’re great at the rolling part once they get the hang of it. For my daughter’s sleepover last month, we made 40 of them in about 20 minutes.
These are perfect for beach days and picnics because they don’t need heating and hold up well in coolers. I pack them in individual containers with ice packs, and they stay fresh for hours. Way better than sandwiches that get soggy in humid weather.
The key is making them part of your routine rather than a special occasion thing. Once you see how easy they are, you’ll find excuses to make them all the time.
What You’ll Need
Here’s everything you need to make these perfectly every time. Most of this you probably already have in your fridge:
- 8 slices Genoa or hard salami (medium thickness from the deli counter)
- 4 oz cream cheese, softened (about 30 minutes at room temperature)
- 2 tablespoons finely diced dill pickles (about 1 small pickle, patted dry)
- 1 tablespoon chopped green onions (just the green parts, optional)
- 1 teaspoon garlic powder or Italian seasoning (start with less, taste and adjust)
- Parchment paper for rolling surface
- Paper towels for keeping everything dry
That’s it! No special equipment needed, just basic kitchen tools you already have.
Detailed Cooking Instructions
These come together so quickly once you get the rhythm down. I can make a full batch in about 8 minutes now, but don’t rush your first time.
Mix the cream cheese filling first. In a small bowl, combine the softened cream cheese, diced pickles (make sure they’re patted dry), green onions, and seasoning. Taste it – this is your chance to adjust flavors before rolling. It should be tangy and flavorful.
Set up your rolling station. Lay out parchment paper on a clean counter and have the salami slices ready. Keep everything cold – if your kitchen is warm, work in batches and put finished roll-ups straight in the fridge.
Spread about a teaspoon of filling on each salami slice. Use the back of a spoon to spread it evenly, leaving a small border around the edges. Don’t overfill – I learned this the hard way when filling squeezed out everywhere.
Roll each slice tightly from one end to the other. Apply gentle, steady pressure as you roll. The salami should overlap slightly on itself to seal. If they’re not staying closed, secure with toothpicks temporarily.
Chill for at least 15 minutes before serving. This helps them hold their shape and actually makes them taste better. In our humid summers, I often chill them for 30 minutes to be safe.
Serve whole or slice into pinwheels. For parties, I slice each roll into 3-4 pieces and arrange them on a platter. For lunch boxes, I leave them whole – they’re easier for kids to handle that way.
You’ve got this! Even if your first batch isn’t perfect, they’ll still taste amazing.
Tips & Tricks

After making these probably 100 times, here are the tricks that make the biggest difference. These little details turn good roll-ups into great ones.
- Pat those pickles completely dry – this single step prevents soggy roll-ups better than anything else I’ve tried
- Let cream cheese soften naturally rather than microwaving when possible – it spreads more evenly and tastes better
- Make extra and freeze half the batch – they thaw perfectly and it’s nice having them ready to go
- Try different pickle types – sweet pickles, bread and butter pickles, or even pickled jalapeños for heat
- Use a pizza cutter to slice them into pinwheels – much easier than a knife and gives cleaner cuts
You Might Also Like
Looking for more easy keto snacks that actually taste good? I’ve got you covered with these family-tested favorites.
- Carbs in Hard Salami: Is It Keto-Friendly? – Get the real facts about whether your favorite deli meat fits your keto goals
- Best Cream Cheese Brands for Keto Recipes – I tested 6 different brands so you don’t have to guess which works best
- 5 Secrets to Perfect Roll-Up Snacks Every Time – Master the technique with these foolproof tips from my New Orleans kitchen
- Quick Keto Snacks for Busy School Mornings – More make-ahead options that actually keep kids happy and full
Frequently Asked Questions
They stay fresh for up to 4 days when stored in an airtight container. I layer them with parchment paper to prevent sticking. They actually taste better after sitting overnight – the flavors meld together nicely.
Absolutely! I always make them the morning of events and slice them into pinwheels right before serving. They hold their shape beautifully and look really elegant on a platter.
Try thin cucumber slices, roasted red pepper strips, or even fresh spinach leaves for crunch. The pickles add tanginess, so you might want to add a squeeze of lemon juice to the cream cheese mixture if you skip them.
Yes! Each roll-up has only about 1 gram of carbs, mostly from the cream cheese. I calculated this using my kitchen scale and a nutrition app, so the numbers are accurate for typical ingredients.
My 8 and 12-year-olds love helping with these. They’re great at the rolling part once they practice a few times. It’s actually a fun activity for playdates or rainy afternoon projects.
I use small glass containers with tight lids and include an ice pack. They travel really well and don’t get soggy like sandwiches do in humid weather.
Save This Recipe for Later
Love these roll-ups? Pin this recipe or bookmark it – you’ll definitely want to make them again!

Planning your next keto picnic, meal prep day, or Mother’s Day brunch? Don’t forget to save this quick and tasty snack for when you need it.
Easy Keto Salami Roll-Ups for Mother’s Day – Perfect No-Cook Snack
Delicious Keto Salami Roll-Ups – Perfect Mother’s Day Appetizer